Monday 27 August 2018

Get Maximum ID of a SharePoint List/Library


I have googled a lot for finding a simple method that will give the maximum ID of a SharePoint list/library. But I have found lots of complex codes and those are also large in lines. I was very astonished that it should be a very simple task. Then I have tried it in my way and it was working:


 private int GetMaxID()
        {
            SPList listName = spWeb.Lists["ListName"];
            int maxID = 0;

            SPListItemCollection listCollection = listName.Items;

            foreach (SPListItem item in listCollection)
            {
                maxID = Convert.ToInt32(item["ID"]);
            }
                
            return maxID;
        }  


It was so simple. Isn't it...........!!

Monday 7 May 2018

On Enter Key Press in any Text Field Visual Web Part/Custom Web Part is going to Edit Mode in SharePoint 2016


It is a common problem with SharePoint 2016 Web Parts. If user press Enter key in any text field in any visual web parts, the navigation bar is going to the Edit Mode and user can edit or delete the sensitive properties of the web part.


This is a huge problem for some business case. Someone telling it is a bug of SharePoint, someone advising to handle it from the server side for every text field but neither seems to be potential solution to me.

Finally, I thought to track the Enter Key press for the whole page and write down a JQuery event to track it and prevent the default action.

So, the solution is to add a Content Editor web part above the Visual Web Part and add the  script as shown below:


Click On Edit Source as shown above add the below script:


<script src="/_layouts/16/Content/js/jquery-1.10.2.min.js"></script>

<script type="text/javascript">

$(document).keypress(function(e) 
{
    if (e.which == 13) 
{
    // don't do a "edit" post default! 
   event.preventDefault();
  
   return false;
    }
});
</script>​​

The Screenshots shows the details:


Press Ok and Save the Page. Hopefully the problem is disappeared.


Happy SharePointing...............!!

Saturday 9 December 2017

SharePoint Portal 2016 Migration Process/Checklist from SharePoint 2013

Following are the steps to migrate SharePoint 2013 intranet portal to SharePoint 2016:

Step 1

Backup everything related to the content database you are migrating.

Step 2: 

Attach the SharePoint 2013 content database to the new database server.

This step only applies if you are also migrating to a new database server during the SharePoint 2016 migration process. If you are not changing database servers, skip to Step 3 as the content database will already be in place and ready to upgrade.


Step 3

Create a new web application in SharePoint 2016

1. Launch SharePoint 2016 Central Administration web site.
2. Navigate: Application Management –> Manage Web Applications
3.
Click New on the ribbon
4. Configure the new web application to replicate the web application being migrated
NOTE: Take the default for Database Name which is "WSS_Content".


Step 4: 

Delete the content database which was just created in Step 3
Yes, you read correctly, delete the content database.


1. Launch SharePoint 2016 Central Administration web site.
2. Navigate: Application Management –> Manage Content Databases
3. Select the web application created in step#2 from the web application drop down located in the upper right of the browser
4. Click on the Database Name which was created in Step 3. It should be named WSS_Content
5. Scroll to the bottom of the database information page displayed and check the Remove Content Database checkbox
6. Click the OK button.


So, what is happening here?

SharePoint requires a target web application for ALL content databases. Why? Because the web application determines which features are supported and installed for all content hosted by that web application. When the actual migration process occurs, the upgrade software scans the content database for all of the features being used by the content (I.E. lists, document repositories, third party, web parts, etc.) and then determines if the target web application supports that feature.


The problem we encounter is that SharePoint has nicely created an empty content database which we are never going to use because we already HAVE a content database (the one we are migrating). So, we need to perform a little bit of cleanup work.


Step 5:  

Validate the SharePoint 2013 content database can be upgraded
SharePoint provides a PowerShell comment which will validate the content database against the web application created in Step#3.

1. Launch SharePoint 2016 Management Shell as an administrator
2. Enter the following command
Test-SPContentDatabase
-Name <DatabaseName>
-WebApplication <URL>


Example:

Test-SPContentDatabase
-Name "WSS_PortalDB"
-WebApplication https://www.portal.com

Review the output for any issues listed as Upgrade Blocked: Yes
Any issue listed as Upgrade Blocked will need to be corrected.
Google will be your dearest friend if you encounter Upgrade Blocked: Yes


Step 6: 


Mount the database onto the web application created in Step#3
This step will upgrade and mount the database against your newly created web application


1. Launch SharePoint 2016 Management Shell as an administrator
2. Enter the following command
Mount-SPContentDatabase
-Name <DatabaseName>
-WebApplication <URL>


Example:

Mount-SPContentDatabase
-Name "WSS_PortalDB"
-WebApplication 
https://www.portal.com

Step 7: 

Reset and validate!
We recommend executing an IISRESET after each migration / upgrade is completed.
Then launch the SharePoint site to validate everything is running.


Dealing with legacy (classic mode) Authentication
Classic mode authentication has been officially depreciated by Microsoft.  If you are migrating a classic mode authentication based content database, you must convert the database to claims based authentication before migration (I.E. while the content database is still attached to SharePoint 2013).  You convert the database to claims based using the Convert-SPWebApplication PowerShell command.

1. Launch SharePoint 2013 Management Shell as an administrator
2. Enter the following command
Convert-SPWebApplication
-Identity <URL>
-To Claims
-RetainPermissions


Example:

Convert-SPWebApplication
-Identity https://www.portal.com
-To Claims
-RetainPermissions


Step 8:

Deploy all Custom Solutions like Visual Web Parts, Event Receiver separately in the newly created portal. And add them in the corresponding pages. Please check.

Step 9:

Surveys should be automatically migrated. Please check.

Step 10:

Yammer should work as it is workingPlease check.

Step 11:

All Master pages should work. Publishing may be needed from SharePoint Designer 2013Please check.

Step 12:

All Lists and Libraries should be migratedPlease check.

Step 13:

All JS and CSS files should be migrated as usualPlease check .

Step 14:

Check all the Site Features and Site Collection Features as it is before migration.

Tuesday 25 April 2017

Fixed SharePoint 2013 Server Installation error "Windows Server App Fabric was not configured correctly".


SharePoint 2013 Server installation....?  Oh no....it's a daunting task for sure. Anyways, every problem has a solution. And we need to install SharePoint 2013 Server in order to continue SharePoint Development.


Following screenshot illustrates the scenario :


Following are the steps to fixed the error :

Problem resolve:

Step 1: regedit => search  "AppFabric" and delete all entries in regedit

Step 2:Restart

Step 3: Open powershell as admin

Step 4: Run the below command


$SharePoint2013Path = "D:\Software\SharePoint\SharePoint2013"


Start-Process "$SharePoint2013Path\PrerequisiteInstaller.exe" /KB2671763:$SharePoint2013Path\PrerequisiteInstallerFiles\AppFabric1.1-RTM-KB2671763-x64-ENU.exe

Start-Process "$SharePoint2013Path\PrerequisiteInstaller.exe" /AppFabric:$SharePoint2013Path\PrerequisiteInstallerFiles\WindowsServerAppFabricSetup_x64.exe

Step  5: Restart

Step 6: Start SP2013 SP1 installation,

Successfully Happy SharePointing............:)

Tuesday 18 April 2017

Increase or modify the number rating text in SharePoint 2013 Survey

Today, I faced a requirement in SharePoint 2013 rating questions that it is expected to use 6 types of rating text like:


  1. Very Satisfied
  2. Satisfied
  3. Somewhat Satisfied
  4. Somewhat Dissatisfied
  5. Dissatisfied
  6. Very Dissatisfied
OR

  1. Strongly Agree
  2. Agree
  3. Somewhat Agree
  4. Somewhat Disagree
  5. Disagree
  6. Somewhat Disagree
But in SharePoint 2013 Server, only 3 to 4 rating text are shown as illustrated in the figures below:


And the in response, the question appears like the screenshot below:


But my goal was to show the 6 texts that is written above. After some net surfing, I get a solution of this problem. First of all, I need to click on the "Respond to this Survey" as shown below:


After that Respond form appears, we need to edit the page as shown below:


Then, you need to add a Script Editor at the bottom of the page as shown below:


Click the "EDIT SNIPPET" and add the following script :

<style>


/* Removes Top Buttons */
table[id*='toolBarTbltop']{display:none;}

/* Removes Line */
.ms-formline {display:none;}

/* Removes Number Headings */
th.ms-gridCol {display:none;}

/* Change Main Question */
.ms-formlabel {font-weight: bold!important;}

/* Change Sub Question Options */
.ms-gridT1, .ms-gridCol {font-weight:normal!important;}

/* Change Sub Question Options Column Width */
.ms-gridCol {color:#444!important; width:110px!important;}

/* Change Sub Question Title Width */
.ms-gridT1 {padding: 0px 0px 10px 0px; width:300px!important;}

</style>

<script language="javascript" type="text/javascript" src="jquery-1.4.2.min.js"></script>
<script language="javascript" type="text/javascript" src="jquery.SPServices-2013.01.min.js"></script>
<script language="javascript" type="text/javascript">

$(document).ready(function (){

// Rating Scale
$("td.ms-gridCol:eq(0)").html("Strongly Agree ");
$("td.ms-gridCol:eq(1)").html("Agree");
$("td.ms-gridCol:eq(2)").html("Somewhat Agree");
$("td.ms-gridCol:eq(3)").html("Somewhat Disagree");
$("td.ms-gridCol:eq(4)").html("Disagree");
$("td.ms-gridCol:eq(5)").html("Strongly Disagree");


Finally, the rating options looks like the screenshots as shown below:


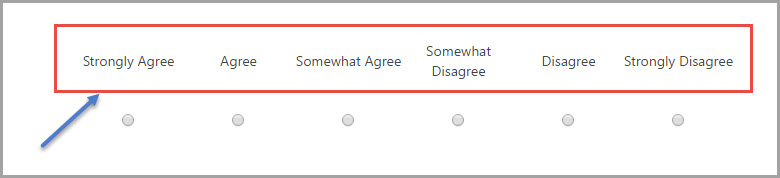
So, the target is achieved.

And

"The best way to escape from problem is to solve the problem."